Showing posts with label sharepoint. Show all posts

Thursday, 18 September 2014

Programatically overriding SharePoint record locks using Records.BypassLocks() in c#

Records are good - they are immutable and cannot be changed by users.

Record Centres are also good - they provide a repository for records that users can submit their documents to, to be transformed into records.

Event receiver rules that automatically commit as records any document submitted to a list are also good, because as soon as content is placed in that list it becomes a records, and so immutable.

However...

What if something goes wrong?  Perhaps a users submits a document that should not be locked as a record ans should be removed, or perhaps the wrong meta data is attached to the record?

In these cases an admin has to temporarily suspend the records management features of SharePoint in order to rectify the fault.  This is a big deal since SharePoint admins have a different role to server admins, and so normally would not have the authority (or indeed the know-how) to do this, whereas the server admins would not be able to understand the records and content.  In my experience the only people who know both how the system works, and what it is supposed to do, are the developers!  And we do NOT want to do admin, because among other things they somehow get paid more than we do...

Furthermore, if you are automatically declaring documents as records when they enter the list, you will not be able to "undeclare" the record from the SharePoint front end without first disabling this feature - quite a risk if you end up having to do this a lot.

This is why I like to create my own tools to fill the gaps, and in this case we programmers can turn to a little known feature of the Object Model to help us:   Records.BypassLocks().

This neat little method, part of the  Microsoft.Office.RecordsManagement.RecordsRepository namespace, allows use to define a delegate function that be be run even on locked down records.  Wrap it in a security delegate and you have the makings of a class that can be used to provide users (preferably power users and admins) with tools to manage their records centre WITHOUT suspending record handling functions.

Remember - this allows you to override records handling, so only use this if you really need to.  However if you have found this blog and read this far, you probably really need to!

Here is a basic method that shows you how to use Records.BypassLocks() in a simple record cancelling scenario.  In this example I pass in URL to the offending record, open a security delegate (in order to ensure that the process has permission to perform this task), and then use BypassLocks to edit the meta-data on the document to change the name and title and set the Status to "CANCELLED".

Please not that I have present this a method inside a class with no constructor - I will leave that up to you (simple copy the methods into whatever class you are working in if this confuses you).

using System;
using System.Collections.Generic;
using System.Linq;
using System.Text;
using Microsoft.SharePoint;
using Microsoft.SharePoint.Publishing;
using Microsoft.SharePoint.Utilities;
using Microsoft.Office.RecordsManagement.RecordsRepository;  //You are going to need to include the dll in teh references
using System.Web;

namespace BusinessLayer
{

   public void Cancelrecord(string documentURL)
   {
        // Pass in the document URL in a format such as:
        //string documentURL = "http://test_reocrds/records/wrong_file.pdf";  

        //Run this in a security delegate

        SPSecurity.RunWithElevatedPrivileges(delegate() {

                using (SPSite site = new SPSite(SPContext.Current.Web.Url))
                {
                    using (SPWeb web = site.OpenWeb())
                    {
                        web.AllowUnsafeUpdates = true;
                        try
                        {

                            SPListItem target = web.GetListItem(documentURL);

                            Records.BypassLocks(target, delegate(SPListItem item)
                            {         //Perform any action on the item. 
                                       CancelItem(item);
                            });

                        }
                        catch (Exception ex)  // it all throws up to here
                        {
                             throw ex;
                        }
                        finally
                        {

                            web.AllowUnsafeUpdates = false;

                        }
                    }
                }
            });
       }

        //Set item name to start with CANCELLED and set status to CANCELLED

        public void CancelItem(SPListItem item)
        {
            try
            {        

                // Update the name of the file

                item.File.CheckOut();
                item.TrySetValue("Name", String.Format("CANCELLED {0}", item.Name));
                item.TrySetValue("Title", String.Format("CANCELLED {0}", item.Title));
                item.TrySetValue("Status", "CANCELLED");  //

                item.Update();

                //This records library is set to use check in/out and versioning so it records any updates such as this

                item.File.CheckIn("CANCELLED", SPCheckinType.MinorCheckIn);

            }
            catch (Exception ex)
            {
                // Permissions failed.  Undo checkout
                item.File.UndoCheckOut();
                throw ex;
            }
        }
    }

}


 In my example above I use an Extensions class to add useful methods to SPListItem class to get or set values.  Here is the class:
using System;

using System.Collections.Generic;
using System.Linq;
using System.Text;
using Microsoft.SharePoint;
namespace BusinessLayer

{

    public static class Extensions

    {

        public static T TryGetValue(this SPListItem listItem, string fieldInternalName)
        {
            if (!String.IsNullOrEmpty(fieldInternalName) &&
                listItem != null &&
                listItem.Fields.ContainsField(fieldInternalName))
            {
                object untypedValue = listItem[fieldInternalName];
                if (untypedValue != null)
                {
                    var value = (T)untypedValue;

                    return value;
                }
            }

            return default(T);
        }

        public static bool TrySetValue(this SPListItem listItem, string fieldInternalName, T value)
        {
            try
            {
                if (!String.IsNullOrEmpty(fieldInternalName) &&
                    listItem != null &&
                    listItem.Fields.ContainsField(fieldInternalName))
                {
                    listItem[fieldInternalName] = value;
                }

                return true;
            }
            catch
            {
                throw;
            }
        }
    }
}


Thursday, 9 January 2014

Hiding the Sharepoint 2010 ribbon from users without losing the scrollbar or title bar area when using a list webpart

There are many blog posts suggesting techniques to hide the Sharepoint ribbon using security trimmed controls in the Sharepoint masterpage, however I have found that none of them properly address the issue of how Sharepoint processes user clicks with the ribbon: namely that the titlebar area will disappear if the ribbon has been hidden with CSS!

In my site I use this area to display location specific information taken from a BCS connection, and provide location specific buttons and actions (all using sharepoint delegate controls), so there was no way I could lose this section of the page. I have therefore had to work out how to stop this from happening.


In order to solve this we must first implement the standard method of hiding the ribbon with CSS, and use a security trimmed control in order to decide which users get to access the ribbon and which do not. This has been gone over in detail elsewhere so I will only briefly recap this now.
First, edit the masterpage and set a style element in the "s4-ribbonrow" div to hide it:
<div class="s4-pr s4-ribbonrowhidetitle" id="s4-ribbonrow" style="display: none;"%>
<%--added display:none to hide Ribbon--%>
Next, add a security trimmed control to make the ribbon visible for administrators (in my case this is users with delete permission, hence I have used the "DeleteListItems" PermissionsString:
<%-- Show the ribbon to power users -->
<sharepoint:spsecuritytrimmedcontrol id="RIBBONHIDE_SPSecurityTrimmedControl3" permissionsstring="DeleteListItems" runat="server">
    <script type="text/javascript">
        document.getElementById("s4-ribbonrow").style.display = "block";
    </script>
</sharepoint:spsecuritytrimmedcontrol>

Installing this masterpage and applying it to your site will hide the ribbon from users without delete permission. Hooray!


HOWEVER...
When implementing this techniques you will find a major flaw: if a list webpart is on the page then when a user who has not got the ribbon clicks on the list webpart in a section that would normally cause the ribbon to show, the user will lose the title area at the top of the page. This includes the logo, the breadcrumb trail, and the social icons. After investigation I determined that this is caused by the Ribbon javascript replacing the title area element with the ribbon, and since you have hidden it, this mean that the whole title area is removed. I've followed this through the whole code and it seems to be related to the custom javascript scrolling function that Sharepoint 2010 uses.


The fix

In order to get around this, we have to make changes to a couple of other areas.

First, we must update the following javascript fuction "OnRibbonMinimizedChanged" that is found in the standard Sharepoint INIT.JS javascript file in the 14 hive. DO NOT edit the file directly! It can be simply overriden by including another javascript file later on in the masterpage (see below). To override this function, first create a file called "HideRibbon.js" with the following in it:
var g_spribbon = new Object();
g_spribbon.isMinimized = true;
g_spribbon.isInited = false;
g_spribbon.minimizedHeight = "44px";
g_spribbon.maximizedHeight = "135px";
function OnRibbonMinimizedChanged(ribbonMinimized) {
    ULSxSy: ;
    var ribbonElement = GetCachedElement("s4-ribbonrow");
    var titleElement = GetCachedElement("s4-titlerow");
    if (ribbonElement) {
        ribbonElement.className = ribbonElement.className.replace("s4-ribbonrowhidetitle", "");
        if (titleElement) {
            titleElement.className = titleElement.className.replace("s4-titlerowhidetitle", "");
            if (ribbonMinimized) {
                titleElement.style.display = "block";
            }
            else {
                //titleElement.style.display = "none"; // MODIFICATION -  Commented out - do not hide this element, or it will hide the whole title area when it thinks a ribbon is required
            }
        }
    }
    var wasInited = g_spribbon.isInited;
    g_spribbon.isInited = true;
    var lastState = g_spribbon.isMinimized;
    g_spribbon.isMinimized = ribbonMinimized;
    if (lastState != ribbonMinimized || !wasInited)
        FixRibbonAndWorkspaceDimensions();
}
Upload this file to your site somewhere (in this example I will use the "Shared Documents" list), and add the following to your masterpage in order to including it:
<asp:scriptmanager enablepagemethods="false" enablepartialrendering="true" enablescriptglobalization="false" enablescriptlocalization="true" id="ScriptManager" runat="server">
    <scripts>
        <asp:scriptreference path="<% $SPUrl:~sitecollection/Shared%20Documents/HideRibbon.js%>" runat="server"></asp:scriptreference> 
    </scripts> 
  </asp:scriptmanager>
Put this section after the body element, directly after the form element. I.e. after the following two lines of the masterpage:
<body scroll="no" onload="if (typeof(_spBodyOnLoadWrapper) != 'undefined') _spBodyOnLoadWrapper();" class="v4master">
  <form id="Form1" runat="server" onsubmit="if (typeof(_spFormOnSubmitWrapper) != 'undefined') {return _spFormOnSubmitWrapper();} else {return true;}">

Now change this line in you masterpage:
<div class="s4-pr s4-notdlg s4-titlerowhidetitle " id="s4-titlerow">

Change it to this to remove the class that tells the javascript that this is the bit to hide:
 <div class="s4-pr s4-notdlg " id="s4-titlerow">
<%-- Changed class to remove to s4-titlerowhidetitle so ribbon does not fire up over top of this --%>

Now you should find that the title bar remains active even when the ribbon is active (thus losing some screen real estate), but that restricted users with no ribbon do not lose their title area when they perform an action that would normally have opened the ribbon :)
Best of luck and happy coding!

Saturday, 22 June 2013

Changing the name and URL of a document in Sharepoint using c#

Changing a document's name in Sharepoint programatically, particularly in a webpart for example, is not a trivial process.  In theory, we can use the SPListItem.Item("Name") property and update this.  However you may find that non-administrative users can receive  "permission denied" error when they save this back to the database (using a web.Update()).

This is generally because in order to move (rename) a file in Sharepoint, the user must have "delete" permission on list.
Provided the users have enough permission, then the code below works.  The trick here is to use an SPFile object to update the "Name" property, whilst using an SPListItem object to control the files checkin/out status.

Keen readers will see that I am doing a ValidateFormDigest() in order to prevent the "Page Validation" error if this is caused from a form's POST action, but there is also a "web.AllowUnsafeUpdates = true;" command.  I would prefer not to allow unsafe updates and would recommend you keep this line uncommented, but I have left it in in order to give you an option if you find that this still does not work properly in your situation.


 using (SPSite site = new SPSite(SPContext.Current.Web.Url))
 {
     using (SPWeb web = site.OpenWeb())
     {
         try
         {
             SPUtility.ValidateFormDigest();
             SPListItem target = web.GetListItem(fileUrl);  // fileURL should be set to the full path of the document you are changing

             if (target.File.CheckOutType == SPFile.SPCheckOutType.None)
             {
                  //web.AllowUnsafeUpdates = true;         // Shouldn't need this with the validateformDigest
                  try
                  {                      target.File.CheckOut();
                      SPFile filet = web.GetFile(target.Url);
                      filet.Item["Name"] = newName;     // newName is the new name of the file                               
                                            
                      target.Update();                                            
                   }
                   catch (Exception ex)
                   {
                       web.AllowUnsafeUpdates = false;
                       target.File.UndoCheckOut();
                       ShowErrorMessage("Error validating document: " + ex.Message);  // Deal with error
                       return;
                   }
                   target.File.CheckIn("", SPCheckinType.MajorCheckIn);  // Make major version
                                           
                   web.Update();
                   web.AllowUnsafeUpdates = false;

              } 

            catch (Exception ex)
            {
                ShowErrorMessage("Error: " + ex.Message);  //Deal with error
                //throw;
            }
            finally
            {
                web.AllowUnsafeUpdates = false;
            }

        }
    }

Friday, 19 October 2012

SharePoint workflow - Delay activity never ends, workflow waits forever.

Carissima Gold 9 ct Yellow Gold Two-Row Diamond Cut Curb Bracelet of 21 cm 8.5-inch on www.yngoo.com
Carissima Gold 9 ct Yellow Gold Two-Row Diamond Cut Curb Bracelet of 21 cm/8.5-inch
Developing Sharepoint workflows using the Windows Workflow Foundation and Visual Studio can be pretty painful. 

By far the most painful part I have come across is the dreaded delay activity never waking up problem. This occurs when you place a delayActivity object in your workflow in order to wait for something to happen (for example in a while loop).  This is pretty fundamental stuff in a workflow, so you would expect this to be a basic requiredment, but for some reason SharePoint has a HUGE flaw in this department: when you are developing your workflows, they seem to get stuck in the delay and never wake up!


A WWF DelayActivity in a while loop


Workflow history - it never wakes up after delay :(


After much head scratching, I have found a solution.  The delayActivity passes control to the SharePoint Services Timer (OWSTIMER.EXE), and this gets confused if you redeploy the wrokflow.

To fix, follow these instructions.

First run this command on your farm:
stsadm -o setproperty -pn job-workflow -pv "Every 5 minutes between 0 and 59" -url http://yoursite
(http://technet.microsoft.com/en-us/library/cc424946%28v=office.12%29.aspx)

(note apparently doesn’t like being anything but 5 minutes! )

I rebooted my dev box after this but this is probably not required.


The key part is that now provided I restart the Microsoft Sharepoint Timer service between deploys, it actually completes a delay!  So remember to recycle the "Sharepoint 2010 Timer" service before you depoly a new version of the workflow to the farm.


OWSTIMER service


Note that this was supposedly a bug fixed in 2007 that is back in 2010.  See this hotfix for 2007 systems: http://www.microsoft.com/en-us/download/details.aspx?id=21066


To debug any code that runs after a delay, you have to attach Visual Studio to the timer service (owstimer.exe), not the w3w process.  I do this by switching off "auto retract after debugging" in the "Sharepoint" page of the project's properties file and manually attaching to the OWSTIMER.EXE process.

Friday, 8 June 2012

Unexpected Error when deploying web part pages using Visual Studio solution

It is good practice to wrap any Sharepoint web part pages you develop in a feature, and deploy them as a solution using Visual Studio. There are many walkthroughs on how to do this on the net, including this excellent Microsoft effort so I won't go into the details here.

If you follow this technique, the basic steps to developing a deployable feature are:
  1. Make your web part page in the Sharepoint front end or Sharepoint designer 
  2. Once development complete, export the page to a site solution file 
  3. Copy the appropriate section to your Sharepoint deployment soluting project
At this point you will end up with something like this:


Note that my solution includes much more than just a web part page - it also has a masterpage, many images, CSS and javascript/jQuery - in other words all the things you need to make a nice custom web part page all in one deployable feature.

So everything is fine, but then you deploy the solution, and ARGHH! it throws an error! Worse, it throws an "Unexpected Error". This is the least useful error message you can imagine. So whats the solution?

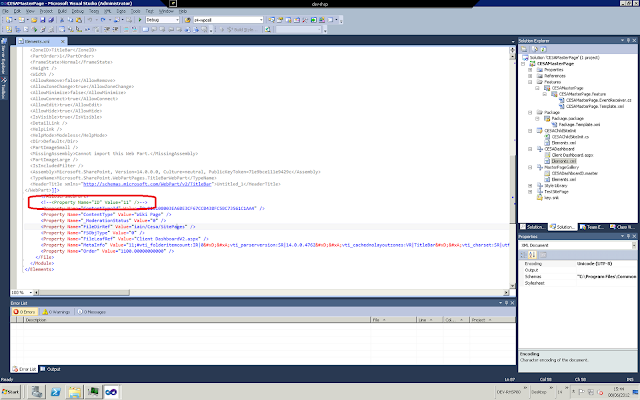
Well after going through all the XML for my features I found the following:

The highlighted line is:


This is the ID of the web part file WHEN IT WAS EXPORTED.

When you deploy this solution to a site, the ID of the file is whatever the next ID available (it's basically an incremental integer). Therefore by leaving in this piece of declarative XML, we are attempting to force the file to use this ID. This is what is causing the "Unexpected error" on deployment.

Simply comment out this line and your solution will deploy. 


Friday, 25 November 2011

Integration between Word 2003 and SharePoint 2010 using Managed Meta-data

You cannot check out/edit/check in directly from Word 2003 if you are using managed meta-data in the list.  Word 2003 does not seem to integrate properly with managed meta-data columns, and will refuse to check in the document.

This leaves teh document in an unsaved, checked out state if a user attempts to edit it directly from Sharepoint.

My only solution to this has been to create a new content type and remove the managed meta-data from it. 


Carissima Gold 9 ct Yellow Gold Two-Row Diamond Cut Curb Bracelet of 21 cm 8.5-inch on www.yngoo.co.uk
Carissima Gold 9 ct Yellow Gold Two-Row Diamond Cut Curb Bracelet of 21 cm/8.5-inch

Friday, 4 November 2011

C# function to get the Content Type GUID from a Sharepoint list using web services

Simple helper function to get the GUID of a list from Sharepoint web services.

Note that in the code below I have a class level object pointing to the Lists.asmx web service called m_listService already established , but I have left in the code to establish this connection in the comments as an example.

string GetListContentTypeGuid(string listName, string listID, string contentTypeName)
        {
            string defaultGuid = "";
            
            try
            {
                
                //ListsService.Lists listService = new ListsService.Lists();
                //listService.Credentials = System.Net.CredentialCache.DefaultCredentials;

                //XmlNode ndList = listService.GetList(fileInfo.m_listInfo.m_listName);
                //XmlNode ndVersion = ndList.Attributes["Version"];

                XmlNode contentTypes = m_listService.GetListContentTypes(listID, "anything");

                // Loop through the fields
                foreach (XmlNode node in contentTypes)
                {
                    System.Diagnostics.Debug.Print(node.Attributes["Name"].Value.ToString());
                    if (node.Attributes["Name"].Value.ToString() == contentTypeName)
                    {
                        defaultGuid = node.Attributes["ID"].Value.ToString();
                        break;
                    }
                }
                
            }
            catch (Exception ex)
            {

                throw new Exception("ERROR: Reading content types from target site.\r\n"
                    + ex.Message + "\r\nDetails: " + ex.InnerException + "\r\n" +
                    "Check the settings file to ensure that the list settings match the target site.", ex);

            }
            return defaultGuid;
        }

Wednesday, 20 July 2011

Sharepoint 2010 managed meta-data taxonomy field data using web services

Sharepoint 2010 includes a very useful new concept: managed meta-data. This allows you to build taxonomic hierarchies, and provide document routing based on the meta-data.

Unfortunately, it seems that using this field type using a web service call is extremely complicated, and hardly seems to be documented at all (this is so typical of Sharepoint stuff...).  Microsoft have given us a new web service class ("taxonomyclientservice") but there hardly any documentation on it all (http://msdn.microsoft.com/en-us/library/microsoft.sharepoint.taxonomy.webservices.taxonomyclientservice.aspx).


Here is an example that I have managed to get working (after MUCH trial and error) that will hopefully help you to do the following:
  1. opens a list using the Lists web service, 
  2. iterates through the fields in the default content type for the list (you can remove this bit and just iterate through the fields in the list if you like),
  3. if it finds a "TaxonomyFieldType" field, it then gets the "Shared Service ID" (GUID of managed meta-data service) and Term Set ID (GUID of term set defined on this field) required to run the Taxonomy web service call
  4. sets up the CAML to run the Taxonomy web service call,
  5. retrieves the taxonomy data for that field in XML.  
 I do not try to analyse what the taxonomy XML means - that is for another day!

Note that all my web service proxies are called "ListService" and "Taxonomys".

//get list data from webservice
ListService.Lists listService = new ListService.Lists();
// Use your own list name
XmlNode list = listService.GetList("My List Name");

// Let's have a look at it
System.Diagnostics.Debug.Print(list.OuterXml);

// Get the content types for this list
//Get our defined content type (see previous post on how to do this - you need your own values here!)
string contentTypeGuid = GetListContentTypeGuid("My List Name", "{GUID}", "My Content Type");

// Now get content type definition 
XmlNode contentType = m_listService.GetListContentType(mylistinfo.m_listName, contentTypeGuid);

//Get the fields from the content type
XmlNodeList nodes = RunXPathQuery(contentType, "//sp:Field");

// Loop through the fields in the content type
foreach (XmlNode node in nodes)
{
 // This stuff just sets up some variables based on the content type and skips over hidden fields
 string Name = node.Attributes["Name"].Value;
 if (Name == "ContentType") continue;
 
 string ID = node.Attributes["ID"].Value;

 if (string.IsNullOrEmpty(ID) || string.IsNullOrEmpty(Name))
     continue;

 bool hidden = false;
 bool ReadOnly = false;
 try { hidden = Convert.ToBoolean(node.Attributes["Hidden"].Value); }
 catch { }
 try { ReadOnly = Convert.ToBoolean(node.Attributes["ReadOnly"].Value); }
 catch { }

 if (hidden || ReadOnly)
     continue;

 string ShowInFileDlg = "";
 try { ShowInFileDlg = node.Attributes["ShowInFileDlg"].Value; }
 catch { }
 if (ShowInFileDlg == "FALSE") continue;


 string StaticName = node.Attributes["StaticName"].Value;
 string DisplayName = node.Attributes["DisplayName"].Value;

 
 // Now we can check the "Type" attribute
 string FieldType = node.Attributes["Type"].Value;

 if (FieldType == "TaxonomyFieldType")
 {
     // WE HAVE A TAXONOMY FIELD!!!

     // Lets get the shared service ID and the termset ID from teh List schema
     string sharedServiceIds = "";
     string termSetId = ""; 
     // jump a few nodes to get the correct bit of the schema (included for clarity)
     XmlNode childNode =  node.ChildNodes[1];
     XmlNode termNodes = childNode.ChildNodes[0];

     //Loop through these nodes until we find the information we need
     foreach (XmlNode term in termNodes.ChildNodes)
     {
         System.Diagnostics.Debug.Print("term = " + term.ChildNodes[0].InnerText.ToString());
         if (term.ChildNodes.Count > 1)
         {
             System.Diagnostics.Debug.Print("value = " + term.ChildNodes[1].InnerText.ToString());
             if (term.ChildNodes[0].InnerText.ToString() == "SspId")
             {
                 // Get shared services ID from list
                 sharedServiceIds = term.ChildNodes[1].InnerText.ToString();
             }
             if (term.ChildNodes[0].InnerText.ToString() == "TermSetId")
             {
                 // Get Term Set ID from list
                 termSetId = term.ChildNodes[1].InnerText.ToString();
             }
         }
  
     }
     
  
     int lcid = System.Globalization.CultureInfo.CurrentUICulture.LCID;
     string serverTermSetTimeStampXml = "";


     string termStoreIds = "<termStoreIds><termStoreId>" + sharedServiceIds + "</termStoreId></termStoreIds>";
     string termSetIds = "<termSetIds><termSetId>" + termSetId + "</termSetId></termSetIds>";
     //Always set timestamp to this
     string oldtimestamp = "<timeStamps><timeStamp>633992461437070000</timeStamp></timeStamps>";
     //Always set version to 1
     string clientVersion = "<versions><version>1</version></versions>";
     string timeStamp = "";

     // Taxonomy web service!!
     Taxonomys.Taxonomywebservice taxonomy = new Taxonomys.Taxonomywebservice();
     taxonomy.Credentials = System.Net.CredentialCache.DefaultCredentials;
     string resultXML = taxonomy.GetTermSets(termStoreIds, termSetIds, lcid, oldtimestamp, clientVersion, out timeStamp);


     //Loop through the XML
     string termValue = "MHA";
     string termGUID = "";
     string parentID = "";
     XmlDocument termSetXML = new XmlDocument();
     termSetXML.LoadXml(resultXML);
     XmlNodeList terms = termSetXML.GetElementsByTagName("T");
     foreach (XmlNode term in terms)
     {
         string termName = term.FirstChild.FirstChild.Attributes["a32"].Value;
         termGUID = term.Attributes["a9"].Value;
         try
         {
             parentID = term.Attributes["a25"].Value;
         }
         catch (Exception)
         {
             parentID = "";
     
         }
  
         System.Diagnostics.Debug.Print("termName = " + termName + ", termGUID = " + termGUID + ", parentID = " + parentID);   
     }                          
     
 }
}


If you would like to know how to analyse the attribute codes returned in the XML, then take a look at this blog entry: http://blogs.solidq.com/sharepoint/Post.aspx?ID=37&title=SharePoint+2010%2C+Managed+Metadata%2C+TaxonomyClientService+in+depth

Thursday, 2 June 2011

Mark ContentType as default in Sharepoint Designer 2010

This is pretty simple stuff, but I just spent ten minutes looking at Sharepoint Designer trying to figure out where I clicked to change the default content type on a list!  I guess I'm just not used to the ribbon :)

Google didn't help (probably too easy a problem for it) so I thought I would right this up in case anyone else was suffering.

I've created a content type, here it is associated with a list in Sharepoint Designer:
But how do I make it default?  I finally spotted the option after clicking through endless options in SP designer - the trick is to highlight the content type (and not click on its name to see the content type editor!) and the look at the ribbon:


Hurray!  There it is.
Click on this and we have a new default:
I hope this helps some other Sharepoint 2010 newbie.

Thursday, 10 March 2011

VBA code to check in a document to Sharepoint and set meta data

Carissima Gold 9 ct Yellow Gold Two-Row Diamond Cut Curb Bracelet of 21 cm 8.5-inch on www.yngoo.co.uk
Carissima Gold 9 ct Yellow Gold Two-Row Diamond Cut Curb Bracelet of 21 cm/8.5-inch
 

The following VBA code will upload a file to Sharepoint 2007 using a web service, and then sest some meta data (the title) for that file in the document library.
Remember, you need to have installed the VBA Microsoft Office 2003 Web Services Toolkit and created a reference to the web service in your project before this will work. See these previous posts for more information on calling Sharepoint web services from VBA:


' Change these values to your own
sSourceFile = "C:\mtest.doc"  ' File to upload
sTargetFile = "HTTP://my sharepoint site/Shared%20Documents/mytest.doc" ' Target site, document library and file name


' First set up DOM document containing fields
Dim xmlDoc As New MSXML2.DOMDocument30
xmlDoc.async = False

xmlText = "<root>" & _
"<Batch OnError='Continue' ListVersion='" & iVersionNumber & "' PreCalc='TRUE' xmlns=''>" & _
"<Method ID='1' Cmd='Update'>" & _
"<Field Name='ID' />" & _
"<Field Name='FileRef'>" & sTargetFile & "</Field>" & _
"<Field Name='Title'>Uploaded from VBA</Field>" & _
"</Method>" & _
"</Batch>" & _
"</root>"


xmlDoc.LoadXml (xmlText)
Debug.Print xmlText

' This bit is just for testing
If xmlDoc.parseError.errorCode <> 0 Then

Set myErr = xmlDoc.parseError
MsgBox (myErr.reason)
GoTo fnUpload_Error
Else
MsgBox xmlDoc.XML
End If

' Set up IXMLDOMNodeList
Dim myXMLNodeList As MSXML2.IXMLDOMNodeList
Dim root As MSXML2.IXMLDOMElement


Set root = xmlDoc.documentElement
Set myXMLNodeList = root.ChildNodes

' Create an array of IXMLDOMNodeList
Dim ar_Fields(1) As IXMLDOMNodeList
Set ar_Fields(0) = myXMLNodeList
'Debug.Print "ar_Fields(0) = " & ar_Fields(0)


' Now set up an array of strings to hold the URL
Dim ar_URL(1) As String
ar_URL(0) = sTargetFile

Debug.Print "ar_URL(0) = " & ar_URL(0)
' Set up the results object
Dim myresults() As struct_CopyResult

' Set up the byte array and read the source file into it
Dim ar_Stream() As Byte
ar_Stream = ReadFile(sSourceFile)


' NOW CALL WEB SERVICE
' The follwoing comes from the "Microsoft Office 2003 Web Services Toolkit":
'"ar_DestinationUrls" is an array with elements defined as String
'"ar_Fields" is an array with elements defined as IXMLDOMNodeList
'"ar_Stream" is an array with elements defined as Byte
'"ar_Results" is an array with elements defined as struct_CopyResult
'See Complex Types: Arrays in Microsoft Office 2003 Web Services Toolkit Help
'for details on implementing arrays.
documentId = copyws.wsm_CopyIntoItems(sDocumentPath, ar_URL, ar_Fields, ar_Stream, myresults)
Debug.Print "DocumentID = " & documentId

Dim updateReturn As IXMLDOMNodeList

Set updateReturn = listws.wsm_UpdateListItems(sListID, myXMLNodeList)

Dim xmlReturnDoc As New MSXML2.DOMDocument30
If (updateReturn.Length > 0) Then    
xmlReturnDoc.LoadXml (updateReturn.Item(0).XML)

Dim errorText As String
errorText = xmlReturnDoc.Text
If (errorText <> "0x00000000") Then
MsgBox ("Error: Cannot upload load file to Sharepoint." & vbCrLf & _
"     : " & errorText & vbCrLf & Err.Description & vbCrLf )

End If
End If

' Uncomment for debug information.
'MsgBox ("Return XML = " & xmlReturnDoc.XML)


I use the following VBA to read the target file in as a byte array:

Private Function ReadFile(ByVal strFileName As String, Optional ByVal lngStartPos As Long = 1, Optional ByVal lngFileSize As Long = -1) As Byte()
    Dim FilNum As Integer
    FilNum = FreeFile
    Open strFileName For Binary As #FilNum
    If lngFileSize = -1 Then
        ReDim ReadFile(LOF(FilNum) - lngStartPos)  
    Else
        ReDim ReadFile(lngFileSize - 1)
    End If
    Get #FilNum, lngStartPos, ReadFile
    Close #FilNum
End Function

Wednesday, 26 January 2011

Sharepoint 2007 Batch Update example using web services and CAML

Here is an example of running a batch update process on Sharepoint 2007 using web services. It was written in C# in Visual Studio 2008.

In this example, I take the value of a text field "Date_x0020_of_x0020_Birth", turn this into a DateTime value, and then use this to update the the value of a DateTime field "Date_x0020_of_x0020_Birth0". Obviously this section of the code will not be particularly generalisable, however I have left in all the code in order to show you the principles involved, and hopefully you will find it useful in building your own batch routines.

In order to get it running, you must create a reference to the Sharepoint Lists web service and call it "ListsService". The SDK shows you how to do this, and is available here: http://www.microsoft.com/downloads/en/details.aspx?FamilyId=6D94E307-67D9-41AC-B2D6-0074D6286FA9&displaylang=en

The GetListItems() method of the Lists web service is used to query the data, and the UpdateListItems() method is used to update items.

I used an XPathNavigator object to filter only rows that contain data. You could just loop through the nodes if you prefer.

CAML is used to query the Sharepoint list and look for items where the "Date_x0020_of_x0020_Birth" is null. Tailor this to your own needs.
For CAML reference, look at the MSDN article here: http://msdn.microsoft.com/en-us/library/lists.lists.getlistitems%28v=office.12%29.aspx

The CAML update command uses owshiddenversion, and so is useful in situations where versioning is enabled. Lists without versioning do not need this field.

If the UpdateListItems command returns an error, in my experience this is usually caused by using an incorrect internal name for a field.  You may need to add the URI prefix "urn:schemas-microsoft-com:office:office#" to the field name (e.g. change line 42 to something like:  "<Field Name=\"urn:schemas-microsoft-com:office:office#{4}\">{5}</Field>").

Full code:
using System;
using System.Collections;
using System.Collections.Generic;
using System.Linq;
using System.Text;
using Microsoft.SharePoint;
using Microsoft.SharePoint.Utilities;
using System.IO;
using System.Xml;
using System.Xml.XPath;
using System.Net;

namespace BatchUpdateDOB
{
    class Program
    {
        static string LogFile = "D:\\BatchUpdateLog.txt";  // Log file location

        static void Main(string[] args)
        {
            try
            {
                StatusMessage("Writing log file to: " + LogFile);
           
                // Set up the variables to be used.
                StringBuilder methodBuilder = new StringBuilder();
                string batch = string.Empty;
                DateTime currentDate = DateTime.Now;
                string formattedDate = SPUtility.CreateISO8601DateTimeFromSystemDateTime(currentDate);
                string fieldToReference = "Date_x0020_of_x0020_Birth";
                string fieldToUpdate = "Date_x0020_of_x0020_Birth0";

                string batchFormat = "<?xml version=\"1.0\" encoding=\"UTF-8\"?>" +
                  "<ows:Batch OnError=\"Return\">{0}</ows:Batch>";

                
                // CAML update command for web service
                string methodFormat = "<Method ID=\"1\" Cmd=\"Update\">" +
                 "<Field Name=\"ID\">{1}</Field>" +
                 "<Field Name=\"FileRef\">{2}</Field>" +
                 "<Field Name=\"owshiddenversion\">{3}</Field>" +
                 "<Field Name=\"{4}\">{5}</Field>" +
                 "</Method>";

                //UPDATE THESE TWO LINES TO SITE SPECIFIC VALUES
                string siteName = "http://<your site root uri here>";
                string listName = "<your list name here>";

                //string viewName = "";  // No need for viewname
                int rowLimit = 10;       //The number of items returned per batch (not used)

                StatusMessage("Processing " + siteName + ", List: " + listName + "...");

                //Web service setup
                //ListService should be the name of your web service reference
                ListService.Lists listService = new ListService.Lists();
                listService.Credentials = System.Net.CredentialCache.DefaultCredentials;
                listService.Url = siteName + "/_vti_bin/Lists.asmx";
                

                //Build CAML query to search for records
                XmlDocument camlDocument = new XmlDocument();
                XmlNode queryNode = camlDocument.CreateElement("Query");
                //queryNode.InnerXml =  "<Where><IsNull><FieldRef Name='Date_x0020_of_x0020_Birth'/></IsNull></Where>";
                //queryNode.InnerXml = "<OrderBy><FieldRef Name='Country' /></OrderBy>";

                XmlNode viewFieldsNode = camlDocument.CreateElement("ViewFields");
                viewFieldsNode.InnerXml = "<FieldRef Name='Title' />" +
                  "<FieldRef Name='owshiddenversion' />" +
                  "<FieldRef Name='" + fieldToReference + "' />" +
                  "<FieldRef Name='" + fieldToUpdate + "' />" +
                  "<FieldRef Name='FileRef' />";

                XmlNode queryOptionsNode = camlDocument.CreateElement("QueryOptions");
                queryOptionsNode.InnerXml = "<ViewAttributes Scope=\"Recursive\" /><IncludeMandatoryColumns>True</IncludeMandatoryColumns>";

                // Get the GUID of the list
                XmlNode ndListView = listService.GetListAndView(listName, "");
                string listGuid = ndListView.ChildNodes[0].Attributes["Name"].Value;
                string listVersion = ndListView.ChildNodes[0].Attributes["Version"].Value;

                // Run the CAML query
                XmlNode resultNode = listService.GetListItems(listGuid, null, queryNode, viewFieldsNode, rowLimit.ToString(), queryOptionsNode, null);
                // If you want to put a rowlimit on, then use this command:
                //XmlNode resultNode = listService.GetListItems(listGUID, null, queryNode, viewFieldsNode, rowLimit.ToString(), queryOptionsNode, null);

                long totalRecords = 0;
               
                //string itemDOB;
                string dob;
                DateTime dtDOB;
                string owsHiddenVersion;  
                string fullFileRef;
                string owsFileRef;
               

                // Create xpath navigator   
                XPathNavigator navigator = resultNode.CreateNavigator();
                // Set up namespace manager for XPath   
                XmlNamespaceManager ns = new XmlNamespaceManager(navigator.NameTable);
                ns.AddNamespace("rs", "urn:schemas-microsoft-com:rowset");
                ns.AddNamespace("z", "#RowSetSchema");

                // Select only the z:row nodes
                XmlNodeList nodes = resultNode.SelectNodes("//*[name()='z:row'] ", ns);

                // Iterate through the returned nodes
                foreach (XmlNode node in nodes)
                {
                    string itemID = node.Attributes["ows_ID"].InnerText;
                    try
                    {
                        dob = node.Attributes["ows_" + fieldToReference].InnerText;
                        owsHiddenVersion = node.Attributes["ows_" + "owshiddenversion"].InnerText;
                        owsFileRef = node.Attributes["ows_" + "FileRef"].InnerText;
                        // For some reason my data is returned in the format: 2#/listname/path, 
                        // where 2 seems to be an id or version number, and listname/path points to the file in relation to the root site.
                        // The following strips that out and gets the full path (required for the CAML update)
                        fullFileRef = siteName + "/" + owsFileRef.Remove(0, owsFileRef.IndexOf("#") + 1);
                    }
                    catch(Exception ex)
                    {
                        // Ignore this row
                        //StatusMessage("ERROR: Cannot process: " + node.InnerXml.ToString() + ": " + ex.Message); // If you want to see why, uncomment
                        continue;
                    }

                    if (String.IsNullOrEmpty(dob)) continue;  // Ignore list items with no value

                    dtDOB = Convert.ToDateTime("01/01/1900"); // Set default value for dates before 1900

                    // Convert date text to DateTime
                    try
                    {
                        dtDOB = Convert.ToDateTime(dob);
                    }
                    catch (Exception ex)
                    {
                        StatusMessage("Cannot process: " + siteName + "/" + fullFileRef + " DOB: " + dob + ".  Setting to 01/01/1900. " + ex.Message);
                    }

                    MessageToFile("Processing: " + fullFileRef + ", DOB = " + dob);

                    methodBuilder.AppendFormat(methodFormat, listGuid, itemID, fullFileRef, owsHiddenVersion, fieldToUpdate, SPUtility.CreateISO8601DateTimeFromSystemDateTime(dtDOB));

                    // Put the pieces together.
                    batch = string.Format(batchFormat, methodBuilder.ToString());
                    //MessageToFile(batch);

                    //Build CAML command to update using Web service
                    XmlDocument xmlDoc = new XmlDocument();
                    XmlElement elBatch = xmlDoc.CreateElement("Batch");
                    elBatch.SetAttribute("OnError", "Continue");
                    elBatch.SetAttribute("ListVersion", listVersion.ToString());
                    elBatch.SetAttribute("ViewName", "");
                    elBatch.InnerXml = methodBuilder.ToString();

                    // This line runs the CAML update command
                    XmlNode updatesResponse = listService.UpdateListItems(listGuid, elBatch);
                    if (updatesResponse.FirstChild.FirstChild.InnerText != "0x00000000") throw new Exception("Could not update properties.\n\n" + updatesResponse.InnerText + "\n" + updatesResponse.FirstChild.FirstChild.InnerText);
                    StatusMessage(fullFileRef + " processed...");

                    totalRecords++;
                }
                StatusMessage("Completed - " + totalRecords + " processed.");
            }
            catch (Exception exp)
            {
                StatusMessage("ERROR: " + exp.Message);
                
            }
            
        }

        
        /// <summary>
        /// Display a  message
        /// </summary>
        /// <param name="myMessage"></param>
        static void StatusMessage(string myMessage)
        {
            Console.WriteLine(myMessage.ToString()); 
            MessageToFile(myMessage);
        }

        /// <summary>
        /// Write message to the log file
        /// </summary>
        /// <param name="myMessage"></param>
        static void MessageToFile(string myMessage)
        {
            using (StreamWriter sw = new StreamWriter(LogFile, true))
            {
                DateTime now = DateTime.Now;
                sw.WriteLine(now.ToString() + ": " + myMessage.ToString());
            }
        }
    }
}

Tuesday, 11 January 2011

Binding a CheckBoxList object to an ordered Sharepoint list of reference values in a web part (c#)

It's common when creating database applications to use reference tables to provide lookup values.  These tables ofter contain a flag that is used to mark a record as no longer available, and an order column that provides a method of putting the values in an order of importantance, perhaps when using them in a drop down list or list of checkboxes.  Sharepoint is NOT a database, however there is no reason why good practice such as this cannot be applied to Sharepoint's list model.

In the following example I will show you how to set up a reference list and then use the Sharepoint object model to programmatically access this list and bind it to an control (in this case a Sharepoint CheckBoxList control).  Once you understand this, you can use the same method to connect to any reference list and bind it to other objects and controls, such as drop down lists. This example has been developed for Sharepoint 2007, but should also work for Sharepoint 2010.


Step 1:  Set up a reference list
Create a new list on your Sharepoint site with teh following structure: 
  • ID - integer (this is a default field) - this will be used as the unique key (lookup value) used to link this reference filed to other lists
  • Title - string (this is a default field) - this is used to hold the description of the reference field, and will be the value shown in lookups
  • SortOrder - integer, default 1000 - this can be used to sort the list values in lookups and programmatically using CAML
  • Enabled - Yes/No field, default Yes - setting to NO will enable you to filter out these values in views and in programmatic lookups in CAML
You can now enter you reference values into the list, for example here is a list of types of medical record:

Step 2:  Add method to webpart that use CAML to read and order the list
Now for the code that reads the Sharepoint list in a structured manner so we can use it in web parts.  First, add the following method to your web part:
/// <summary>
/// Returns a list collection, ordered using a field in the list called "SortOrder"
/// </summary>
/// <param name="listName">The literal string name of the list to query</param>
/// <returns>SPListItemCollection</returns>
private SPListItemCollection ReadOrderedList(string listName)
{
    try
    {
        using (SPWeb configWeb = SPContext.Current.Site.OpenWeb())
        {
            //Get the list
            SPList lookupList = configWeb.Lists[listName];
            // Use CAML to order the list
            SPQuery query = new SPQuery();
            // This CAML where clause searches for only items where the Enabled field is set to "Yes"
            query.Query = "<Where><Eq><FieldRef Name=\"Enabled\" /><Value Type=\"Integer\">1</Value></Eq></Where> ";
            // This CAML order by claus uses an integer field of "SortOrder"
            query.Query += "<OrderBy><FieldRef Name=\"SortOrder\" /></OrderBy>";
            SPListItemCollection lookupItems = lookupList.GetItems(query);
            return lookupItems;
        }
    }
    catch (Exception ex)
    {
        ErrorTrap("ReadOrderedList: " + ex.Message + Environment.NewLine + ex.StackTrace.ToString());
        throw;
    }
} 

This method will return the content of the list in a SPListItemCollection object. CAML is use to order the list by the "SortOrder" column, and to ignore values that do not have the boolean field "Enabled" set to true.

Step 3:  Bind the list to a control
At the class level of your webpart, create the control that you wish to bind to (in this case a CheckBoxList):

CheckBoxList myCheckList = new CheckBoxList();

To bind this control to your Sharpoint list, put this code in the CreateChildControls() method. Simply replace "My List" with the real name of your list:
// Set up the Record Section checkboxes list
    SPListItemCollection dt = ReadOrderedList("My List");
    myCheckList.DataSource = dt;
    myCheckList.DataTextField = "Title";
    myCheckList.DataValueField = "ID";
    myCheckList.DataBind();

That's it! You now have a Sharepoint object bound to your Sharepoint list of reference values.  When rendered, the output will look something like this:


Yyou can use the following method to render the CheckBoxList to the web part.  This example puts the CheckBoxList in a DIV that fixes the maximum size of the list with a scrollbar.
/// <summary>
/// render a list of checkboxes  to the page
/// </summary>
void RenderCheckBoxes()
{
    try
    {
        // Set up list of checkboxes
        myCheckList.EnableViewState = true;
        myCheckList.CellSpacing = 0;
        myCheckList.CellPadding = 0;

        for (int i = 0; i < myCheckList.Items.Count; i++)
        {
            ListItem li = new ListItem(myCheckList.Items[i].Text, myCheckList.Items[i].Value);
           
            // Set all boxes to selected if not a postback
            if (!Page.IsPostBack)
            {
                myCheckList.Items[i].Selected = true;
            }

        }
        // Give the checklist an ID (can use this in javascript etc)
        myCheckList.ID = "RecordSections";

        //Add controls to web part
        Controls.Add(new LiteralControl(@"<TABLE border='0' bordercolor='red' cellpadding='0' cellspacing='0' valign='top'>"));
        Controls.Add(new LiteralControl("<TR>"));
        Controls.Add(new LiteralControl("<TD>"));
        Controls.Add(new LiteralControl(@"<div class=""ms-frombody""><b>Record Sections</b></div>"));
        Controls.Add(new LiteralControl("</TD>"));
        Controls.Add(new LiteralControl("</TR>"));
        Controls.Add(new LiteralControl("<TR>"));

        Controls.Add(new LiteralControl("<TD>\r\n"));
        Controls.Add(new LiteralControl(@"<input type=""hidden"" id=""ScrollPos"" runat=""server""/>"));

        Controls.Add(new LiteralControl(@"<div id='RecordSectionScroll' style=""OVERFLOW: auto; WIDTH: 247px;  TOP: 0px; HEIGHT: 300px"" onscroll=""javascript:document.getElementById('ScrollPos').value = this.scrollTop""> "));

        Controls.Add(myCheckList);
        Controls.Add(new LiteralControl("</div></TD>"));
        Controls.Add(new LiteralControl("</TR>"));     
        Controls.Add(new LiteralControl("</TABLE>"));
    }
    catch (Exception ex)
    {
        ErrorTrap("RenderCheckBoxes" + ex.Message + Environment.NewLine + ex.StackTrace.ToString());
    }
}

Note that I am using literal controls to render the check boxes in a HTML table. This is pretty horrible and I don't recommend it, but it does work.

Here is the ErrorTrap method. Note that this is just a simple error handling function and is not required to render a checklist bound to a Sharepoint list, but since it appears in the examples I though I would show you what I do.
/// <summary>
/// Give an error message
/// </summary>
/// <param name="myMessage"></param>
void ErrorTrap(string myMessage)
{
    Controls.Add(new LiteralControl("<strong>ERROR: " + myMessage.ToString() + "<BR/></strong>"));
    ErrorToFile(myMessage);          
}

/// <summary>
/// Write errors to the log file
/// </summary>
/// <param name="myMessage"></param>
void ErrorToFile(string myMessage)
{
    using (StreamWriter sw = new StreamWriter("D:\\SearchErrorLog.txt"))
    {
        DateTime now = new DateTime();
        sw.Write(now.ToString() + ": " + myMessage.ToString());
    }
}

Tuesday, 16 November 2010

Render Content Type fields as a form in Sharepoint Web Part using c#

In this blog entry I will give you some example code that will render a simple form in a Sharepoint 2007 web part. The form fields are taken from a pre-defined Sharepoint Content Type. I struggled to find any examples of this on the net, despite it seeming to me to be a fairly ordinary thing to want to do (after all, if you go to all the trouble of defined your own Content Types to organise your data, surely you would want to use them in your own web parts?).

In order to develop this, I used C# / Visual Studio 2008 and Sharpoint 2007. This should also work in Visual Studio 2005, although you will have to install the web part manually - Visual Studio 2008 has far tighter links to Sharepoint, meaning debugging and deploying is much easier. It should also work in VS2010 / Sharepoint 2010.

The following method will return a SPContentType object, you only need to pass it a list name and content type name.  The SPContentType object can be used later to iterate through its fields in oder to render controls based on the content type's fields.


/// <summary>
/// Returns the content type object
/// </summary>
/// <param name="listName"></param>
/// <param name="contentTypeName"></param>
/// <returns></returns>
SPContentType ReadContentType(string listName, string contentTypeName)
{

    //get the web
    this._web = Microsoft.SharePoint.SPContext.Current.Web;

    SPList dirList = this._web.Lists[listName];
    SPContentType contentType = dirList.ContentTypes[contentTypeName];

    //You could simply iterate here like this if you wish, like this:
    //foreach (SPField field in _contentType.Fields)
    //{
    //    string dispName = field.Title;
    //    SPFieldType type = field.Type;
    //    object defaultValue = field.DefaultValue;

    //}

    return contentType;
}

The following code overrides the "CreateChildControls" Sharepoint method to create our own controls based on the content type.  In this example, only text fields and date-times are rendered, but hopefully it straight forward enough for you can see how you could extend this. Simply change: 
"Your_List_Name" and "Your_Content_Type_Name" 
to your actual values from your Sharepoint site.
I use the "LiteralControl" method to render raw HTML on the page to format the form, which feels really nasty but is efective.

protected override void CreateChildControls()
{
    //Controls.Clear();
    //base.CreateChildControls();

    // Read in the content type for the target list
    SPContentType contentType = ReadContentType("Your_List_Name", "Your_Content_Type_Name");
    
    Controls.Add(new LiteralControl("<TABLE>"));

    foreach (SPField field in contentType.Fields)
    {
        // Ignore hidden or readonly fields
        if (field.Hidden) continue;
        if (field.ReadOnlyField) continue;     

        if (field.Type == SPFieldType.Text)
        {
            string dispName = field.Title;
            string staticName = field.StaticName;
            SPFieldType type = field.Type;
            object defaultValue = field.DefaultValue;

            Controls.Add(new LiteralControl("<TR>"));
            Controls.Add(new LiteralControl("<TD>"));
            Label lbl = new Label();
            lbl.Text = dispName;

            Controls.Add(lbl);

            Controls.Add(new LiteralControl("</TD>"));

            // Textbox
            TextBox tb = new TextBox();
            // I give my controls a unique ID so I can reference them later
            tb.ID = "xx_ctl_xx" + dispName;
            
            if(defaultValue != null)
                tb.Text = defaultValue.ToString();

            Controls.Add(new LiteralControl("<TD>"));
            Controls.Add(tb);
            Controls.Add(new LiteralControl("</TD>"));
            Controls.Add(new LiteralControl("</TR>"));

        }
        else if (field.Type == SPFieldType.DateTime)
        {
            
            string dispName = field.Title;
            string staticName = field.StaticName;
            SPFieldType type = field.Type;
            object defaultValue = field.DefaultValue;

            Label lbl = new Label();
            lbl.Text = dispName;

            Controls.Add(new LiteralControl("<TR>"));
            Controls.Add(new LiteralControl("<TD>"));
            Controls.Add(lbl);
            Controls.Add(new LiteralControl("</TD>"));

            // Datetime picker
            SPDatePickerControl dtp = new SPDatePickerControl();
            dtp.ID = "xx_ctl_xx" + staticName;
           
            if (defaultValue != null)
                dtp.SelectedDate = defaultValue.ToString();

            Controls.Add(new LiteralControl("<TD>"));
            Controls.Add(dtp);
            
            Controls.Add(new LiteralControl("</TD>"));
            Controls.Add(new LiteralControl("</TR>"));
        }       
    }
    Controls.Add(new LiteralControl("</TABLE>"));

    //In my code, I use the controls to perform a custom search.  The following code plugs in
    //the event handler to do this, based on the values the user puts into the controls rendered above.
    //This blog post will not go into the detail of this so I have commented the following lines out.
    //cmdSearch = new Button();
    //cmdSearch.Text = "Start Search";
    //cmdSearch.Click += new EventHandler(cmdSearch_Click);
    //this.Controls.Add(cmdSearch);

    //lblQueryResult = new Label();                     
    //this.Controls.Add(lblQueryResult);
    
    base.CreateChildControls();
}

Once deployed, you can add this web part to your site in the normal way using the web front end.  Depending on the fields in your content type, it should render something like this (web part highlighted in pink):