Friday, 8 June 2012

Unexpected Error when deploying web part pages using Visual Studio solution

It is good practice to wrap any Sharepoint web part pages you develop in a feature, and deploy them as a solution using Visual Studio. There are many walkthroughs on how to do this on the net, including this excellent Microsoft effort so I won't go into the details here.

If you follow this technique, the basic steps to developing a deployable feature are:
  1. Make your web part page in the Sharepoint front end or Sharepoint designer 
  2. Once development complete, export the page to a site solution file 
  3. Copy the appropriate section to your Sharepoint deployment soluting project
At this point you will end up with something like this:


Note that my solution includes much more than just a web part page - it also has a masterpage, many images, CSS and javascript/jQuery - in other words all the things you need to make a nice custom web part page all in one deployable feature.

So everything is fine, but then you deploy the solution, and ARGHH! it throws an error! Worse, it throws an "Unexpected Error". This is the least useful error message you can imagine. So whats the solution?

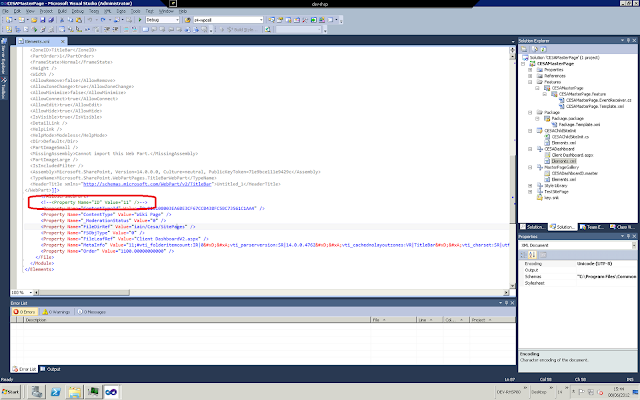
Well after going through all the XML for my features I found the following:

The highlighted line is:


This is the ID of the web part file WHEN IT WAS EXPORTED.

When you deploy this solution to a site, the ID of the file is whatever the next ID available (it's basically an incremental integer). Therefore by leaving in this piece of declarative XML, we are attempting to force the file to use this ID. This is what is causing the "Unexpected error" on deployment.

Simply comment out this line and your solution will deploy. 


Friday, 25 November 2011

Integration between Word 2003 and SharePoint 2010 using Managed Meta-data

You cannot check out/edit/check in directly from Word 2003 if you are using managed meta-data in the list.  Word 2003 does not seem to integrate properly with managed meta-data columns, and will refuse to check in the document.

This leaves teh document in an unsaved, checked out state if a user attempts to edit it directly from Sharepoint.

My only solution to this has been to create a new content type and remove the managed meta-data from it. 


Carissima Gold 9 ct Yellow Gold Two-Row Diamond Cut Curb Bracelet of 21 cm 8.5-inch on www.yngoo.co.uk
Carissima Gold 9 ct Yellow Gold Two-Row Diamond Cut Curb Bracelet of 21 cm/8.5-inch

Friday, 4 November 2011

C# function to get the Content Type GUID from a Sharepoint list using web services

Simple helper function to get the GUID of a list from Sharepoint web services.

Note that in the code below I have a class level object pointing to the Lists.asmx web service called m_listService already established , but I have left in the code to establish this connection in the comments as an example.

string GetListContentTypeGuid(string listName, string listID, string contentTypeName)
        {
            string defaultGuid = "";
            
            try
            {
                
                //ListsService.Lists listService = new ListsService.Lists();
                //listService.Credentials = System.Net.CredentialCache.DefaultCredentials;

                //XmlNode ndList = listService.GetList(fileInfo.m_listInfo.m_listName);
                //XmlNode ndVersion = ndList.Attributes["Version"];

                XmlNode contentTypes = m_listService.GetListContentTypes(listID, "anything");

                // Loop through the fields
                foreach (XmlNode node in contentTypes)
                {
                    System.Diagnostics.Debug.Print(node.Attributes["Name"].Value.ToString());
                    if (node.Attributes["Name"].Value.ToString() == contentTypeName)
                    {
                        defaultGuid = node.Attributes["ID"].Value.ToString();
                        break;
                    }
                }
                
            }
            catch (Exception ex)
            {

                throw new Exception("ERROR: Reading content types from target site.\r\n"
                    + ex.Message + "\r\nDetails: " + ex.InnerException + "\r\n" +
                    "Check the settings file to ensure that the list settings match the target site.", ex);

            }
            return defaultGuid;
        }

Wednesday, 20 July 2011

Sharepoint 2010 managed meta-data taxonomy field data using web services

Sharepoint 2010 includes a very useful new concept: managed meta-data. This allows you to build taxonomic hierarchies, and provide document routing based on the meta-data.

Unfortunately, it seems that using this field type using a web service call is extremely complicated, and hardly seems to be documented at all (this is so typical of Sharepoint stuff...).  Microsoft have given us a new web service class ("taxonomyclientservice") but there hardly any documentation on it all (http://msdn.microsoft.com/en-us/library/microsoft.sharepoint.taxonomy.webservices.taxonomyclientservice.aspx).


Here is an example that I have managed to get working (after MUCH trial and error) that will hopefully help you to do the following:
  1. opens a list using the Lists web service, 
  2. iterates through the fields in the default content type for the list (you can remove this bit and just iterate through the fields in the list if you like),
  3. if it finds a "TaxonomyFieldType" field, it then gets the "Shared Service ID" (GUID of managed meta-data service) and Term Set ID (GUID of term set defined on this field) required to run the Taxonomy web service call
  4. sets up the CAML to run the Taxonomy web service call,
  5. retrieves the taxonomy data for that field in XML.  
 I do not try to analyse what the taxonomy XML means - that is for another day!

Note that all my web service proxies are called "ListService" and "Taxonomys".

//get list data from webservice
ListService.Lists listService = new ListService.Lists();
// Use your own list name
XmlNode list = listService.GetList("My List Name");

// Let's have a look at it
System.Diagnostics.Debug.Print(list.OuterXml);

// Get the content types for this list
//Get our defined content type (see previous post on how to do this - you need your own values here!)
string contentTypeGuid = GetListContentTypeGuid("My List Name", "{GUID}", "My Content Type");

// Now get content type definition 
XmlNode contentType = m_listService.GetListContentType(mylistinfo.m_listName, contentTypeGuid);

//Get the fields from the content type
XmlNodeList nodes = RunXPathQuery(contentType, "//sp:Field");

// Loop through the fields in the content type
foreach (XmlNode node in nodes)
{
 // This stuff just sets up some variables based on the content type and skips over hidden fields
 string Name = node.Attributes["Name"].Value;
 if (Name == "ContentType") continue;
 
 string ID = node.Attributes["ID"].Value;

 if (string.IsNullOrEmpty(ID) || string.IsNullOrEmpty(Name))
     continue;

 bool hidden = false;
 bool ReadOnly = false;
 try { hidden = Convert.ToBoolean(node.Attributes["Hidden"].Value); }
 catch { }
 try { ReadOnly = Convert.ToBoolean(node.Attributes["ReadOnly"].Value); }
 catch { }

 if (hidden || ReadOnly)
     continue;

 string ShowInFileDlg = "";
 try { ShowInFileDlg = node.Attributes["ShowInFileDlg"].Value; }
 catch { }
 if (ShowInFileDlg == "FALSE") continue;


 string StaticName = node.Attributes["StaticName"].Value;
 string DisplayName = node.Attributes["DisplayName"].Value;

 
 // Now we can check the "Type" attribute
 string FieldType = node.Attributes["Type"].Value;

 if (FieldType == "TaxonomyFieldType")
 {
     // WE HAVE A TAXONOMY FIELD!!!

     // Lets get the shared service ID and the termset ID from teh List schema
     string sharedServiceIds = "";
     string termSetId = ""; 
     // jump a few nodes to get the correct bit of the schema (included for clarity)
     XmlNode childNode =  node.ChildNodes[1];
     XmlNode termNodes = childNode.ChildNodes[0];

     //Loop through these nodes until we find the information we need
     foreach (XmlNode term in termNodes.ChildNodes)
     {
         System.Diagnostics.Debug.Print("term = " + term.ChildNodes[0].InnerText.ToString());
         if (term.ChildNodes.Count > 1)
         {
             System.Diagnostics.Debug.Print("value = " + term.ChildNodes[1].InnerText.ToString());
             if (term.ChildNodes[0].InnerText.ToString() == "SspId")
             {
                 // Get shared services ID from list
                 sharedServiceIds = term.ChildNodes[1].InnerText.ToString();
             }
             if (term.ChildNodes[0].InnerText.ToString() == "TermSetId")
             {
                 // Get Term Set ID from list
                 termSetId = term.ChildNodes[1].InnerText.ToString();
             }
         }
  
     }
     
  
     int lcid = System.Globalization.CultureInfo.CurrentUICulture.LCID;
     string serverTermSetTimeStampXml = "";


     string termStoreIds = "<termStoreIds><termStoreId>" + sharedServiceIds + "</termStoreId></termStoreIds>";
     string termSetIds = "<termSetIds><termSetId>" + termSetId + "</termSetId></termSetIds>";
     //Always set timestamp to this
     string oldtimestamp = "<timeStamps><timeStamp>633992461437070000</timeStamp></timeStamps>";
     //Always set version to 1
     string clientVersion = "<versions><version>1</version></versions>";
     string timeStamp = "";

     // Taxonomy web service!!
     Taxonomys.Taxonomywebservice taxonomy = new Taxonomys.Taxonomywebservice();
     taxonomy.Credentials = System.Net.CredentialCache.DefaultCredentials;
     string resultXML = taxonomy.GetTermSets(termStoreIds, termSetIds, lcid, oldtimestamp, clientVersion, out timeStamp);


     //Loop through the XML
     string termValue = "MHA";
     string termGUID = "";
     string parentID = "";
     XmlDocument termSetXML = new XmlDocument();
     termSetXML.LoadXml(resultXML);
     XmlNodeList terms = termSetXML.GetElementsByTagName("T");
     foreach (XmlNode term in terms)
     {
         string termName = term.FirstChild.FirstChild.Attributes["a32"].Value;
         termGUID = term.Attributes["a9"].Value;
         try
         {
             parentID = term.Attributes["a25"].Value;
         }
         catch (Exception)
         {
             parentID = "";
     
         }
  
         System.Diagnostics.Debug.Print("termName = " + termName + ", termGUID = " + termGUID + ", parentID = " + parentID);   
     }                          
     
 }
}


If you would like to know how to analyse the attribute codes returned in the XML, then take a look at this blog entry: http://blogs.solidq.com/sharepoint/Post.aspx?ID=37&title=SharePoint+2010%2C+Managed+Metadata%2C+TaxonomyClientService+in+depth

Thursday, 2 June 2011

Mark ContentType as default in Sharepoint Designer 2010

This is pretty simple stuff, but I just spent ten minutes looking at Sharepoint Designer trying to figure out where I clicked to change the default content type on a list!  I guess I'm just not used to the ribbon :)

Google didn't help (probably too easy a problem for it) so I thought I would right this up in case anyone else was suffering.

I've created a content type, here it is associated with a list in Sharepoint Designer:
But how do I make it default?  I finally spotted the option after clicking through endless options in SP designer - the trick is to highlight the content type (and not click on its name to see the content type editor!) and the look at the ribbon:


Hurray!  There it is.
Click on this and we have a new default:
I hope this helps some other Sharepoint 2010 newbie.

Thursday, 10 March 2011

VBA code to check in a document to Sharepoint and set meta data

Carissima Gold 9 ct Yellow Gold Two-Row Diamond Cut Curb Bracelet of 21 cm 8.5-inch on www.yngoo.co.uk
Carissima Gold 9 ct Yellow Gold Two-Row Diamond Cut Curb Bracelet of 21 cm/8.5-inch
 

The following VBA code will upload a file to Sharepoint 2007 using a web service, and then sest some meta data (the title) for that file in the document library.
Remember, you need to have installed the VBA Microsoft Office 2003 Web Services Toolkit and created a reference to the web service in your project before this will work. See these previous posts for more information on calling Sharepoint web services from VBA:


' Change these values to your own
sSourceFile = "C:\mtest.doc"  ' File to upload
sTargetFile = "HTTP://my sharepoint site/Shared%20Documents/mytest.doc" ' Target site, document library and file name


' First set up DOM document containing fields
Dim xmlDoc As New MSXML2.DOMDocument30
xmlDoc.async = False

xmlText = "<root>" & _
"<Batch OnError='Continue' ListVersion='" & iVersionNumber & "' PreCalc='TRUE' xmlns=''>" & _
"<Method ID='1' Cmd='Update'>" & _
"<Field Name='ID' />" & _
"<Field Name='FileRef'>" & sTargetFile & "</Field>" & _
"<Field Name='Title'>Uploaded from VBA</Field>" & _
"</Method>" & _
"</Batch>" & _
"</root>"


xmlDoc.LoadXml (xmlText)
Debug.Print xmlText

' This bit is just for testing
If xmlDoc.parseError.errorCode <> 0 Then

Set myErr = xmlDoc.parseError
MsgBox (myErr.reason)
GoTo fnUpload_Error
Else
MsgBox xmlDoc.XML
End If

' Set up IXMLDOMNodeList
Dim myXMLNodeList As MSXML2.IXMLDOMNodeList
Dim root As MSXML2.IXMLDOMElement


Set root = xmlDoc.documentElement
Set myXMLNodeList = root.ChildNodes

' Create an array of IXMLDOMNodeList
Dim ar_Fields(1) As IXMLDOMNodeList
Set ar_Fields(0) = myXMLNodeList
'Debug.Print "ar_Fields(0) = " & ar_Fields(0)


' Now set up an array of strings to hold the URL
Dim ar_URL(1) As String
ar_URL(0) = sTargetFile

Debug.Print "ar_URL(0) = " & ar_URL(0)
' Set up the results object
Dim myresults() As struct_CopyResult

' Set up the byte array and read the source file into it
Dim ar_Stream() As Byte
ar_Stream = ReadFile(sSourceFile)


' NOW CALL WEB SERVICE
' The follwoing comes from the "Microsoft Office 2003 Web Services Toolkit":
'"ar_DestinationUrls" is an array with elements defined as String
'"ar_Fields" is an array with elements defined as IXMLDOMNodeList
'"ar_Stream" is an array with elements defined as Byte
'"ar_Results" is an array with elements defined as struct_CopyResult
'See Complex Types: Arrays in Microsoft Office 2003 Web Services Toolkit Help
'for details on implementing arrays.
documentId = copyws.wsm_CopyIntoItems(sDocumentPath, ar_URL, ar_Fields, ar_Stream, myresults)
Debug.Print "DocumentID = " & documentId

Dim updateReturn As IXMLDOMNodeList

Set updateReturn = listws.wsm_UpdateListItems(sListID, myXMLNodeList)

Dim xmlReturnDoc As New MSXML2.DOMDocument30
If (updateReturn.Length > 0) Then    
xmlReturnDoc.LoadXml (updateReturn.Item(0).XML)

Dim errorText As String
errorText = xmlReturnDoc.Text
If (errorText <> "0x00000000") Then
MsgBox ("Error: Cannot upload load file to Sharepoint." & vbCrLf & _
"     : " & errorText & vbCrLf & Err.Description & vbCrLf )

End If
End If

' Uncomment for debug information.
'MsgBox ("Return XML = " & xmlReturnDoc.XML)


I use the following VBA to read the target file in as a byte array:

Private Function ReadFile(ByVal strFileName As String, Optional ByVal lngStartPos As Long = 1, Optional ByVal lngFileSize As Long = -1) As Byte()
    Dim FilNum As Integer
    FilNum = FreeFile
    Open strFileName For Binary As #FilNum
    If lngFileSize = -1 Then
        ReDim ReadFile(LOF(FilNum) - lngStartPos)  
    Else
        ReDim ReadFile(lngFileSize - 1)
    End If
    Get #FilNum, lngStartPos, ReadFile
    Close #FilNum
End Function

Sunday, 27 February 2011

Deploy Office 2003 VSTO add in to All Users using Visual Studio 2008

Deploying VSTO add-ins can be a real pain, at least if you are not using 2010.  Having just successfully deployed my first add-in, I thought it would be useful to explain how I did and the resources I used.

Firstly, it is important that you follow the instructions for the appropriate version of Office and Visual Studio that you are using.  My example is for a legacy solution using Office 2003, created with VSTO Second Edition (Visual Studio 2008).  The general  principles are the same for other editions, but the specifics may be subtly different.

To get started, look at the walkthrough here:

http://msdn.microsoft.com/en-us/library/bb332052.aspx
This is another useful collection of resources:
http://xldennis.wordpress.com/2007/03/04/creating-and-deploying-managed-com-add-ins-with-vsto-2005-se-part-vi/

This explains how to configure a deployment project in Visual Studio 2008 and set up the additional security package required to grant the add-in full trust.  I would recommend you follow the steps in here to create a brand new simple package and get that working first.  I created a simple Word 2003 add-in package to test, rather than the suggested Outlook.

The security package can be downloaded from MSDN here:
http://code.msdn.microsoft.com/VSTO3MSI
Unpackage the download and you should find a .SLN file that has everything pre-configured.  Copy the "SetSecurity" package from here and add it to your solution as explained in the walkthrough.  Configure the Setup project's outputs as described, and you should end up with a package that looks something like this:


Once you have built your setup package, you can find the .MSI and .EXE files in solution bin/debug (or bin/release) directory.   Run the .exe and you should have installed your add-in onto your development machine.  Run the appropriate Office application to check that the pop up message appears to confirm this.  Your development computer should have all the pre-requisites installed, so if this doesn't work you have probably missed something in the walkthrough, or have perhaps used an incorrect version of the setup project, so go back and double check everything.   It is vital that you get a simple version working at this stage, or it will cause you all sorts of problems down the line.

Once you have a simple install project working you can go about making it available to ALL USERS on the machine.  This is not  covered in the walkthrough,  although there is mention of it for newer versions of Office in this excellent blog here:
http://blogs.msdn.com/b/mshneer/archive/2008/04/24/deploying-your-vsto-add-in-to-all-users-part-iii.aspx

In Office 2003, deploying to all users is actually really simple:  all we have to do is copy the registry keys that have automatically been generated for us by Visual Studio in the Setup project from HKCU to HKLM.  In practice, this mean highlighting your setup project (called Word2003AddInSetup in my example), right click and choose "View" and "Registry":
This will open up the registry editor.   Now, expand all, and renambe the "Software" key in HKLM to some temporary name (say "SoftwareTESTTESTTEST").

You can now drag the "Software" key from the HKCU leaf to the HKLM leaf.  Once done, drag your renamed "SoftwareTESTTESTTEST" key from HKLM to HKCU, and rename this back to "Software".  You should now have something that looks like this:
One thing that is not really very well documented at all, and kept me scratching my head for many days, is that you must set the "InstallAllUsers" property on the setup package to "True".  This is obvious, but not mentioned anywhere! 


That's it!  Build your setup solution and re-install it (you will have to un-install your original version first).  You should now find that any user that logs into the machine will have the add in enabled.

Please note that if you are using Office 2007, this technique does not work - you will have to refer to the blog post linked above to learn how to set up the appropriate registry keys.